Showing posts with label Blogger Hacks. Show all posts

Thursday, August 6, 2009

SEO Tips - How to improve increase alexa ranking

0 comments

Alexa rank is key factor for any site and its reputation. Alexa rank is indication of site popularity. Better the alexa rank, more is site popular. Even advertisers are considering alexa rank as key factor and always prefer site with good alexa rank. So, it is necessary for blogger to know importance of alexa rank and work accordingly to optimize alexa rank. Below I have mentioned some useful tips to improve site alexa rank… just try out these tricks and you will find your alexa rank improved.

Improve increase alexa rank

How is alexa rank calculated??

Alexa rank is calculated mainly on basis of alexa toolbar hits to a particular site. “Alexa toolbar” is toolbar released by alexa to be installed in your web browser. So, it is not amount of traffic that determines the alexa rank, but actually the traffic with alexa toolbar installed. So, webmasters have to take efforts to attract alexa toolbar installed traffic to their site. But generally, larger the traffic, greater is chance of getting alexa toolbar hits to the site.

Tips to increase your alexa ranking:

1. Site traffic:

Generally, site traffic is inversely proportional to alexa rank. Larger the site traffic, smaller (in number) is alexa rank, which is desired. So, it is better to increase site traffic. I have written an article on 6 Tips to increase site visitors … may help you.

2. Use redirect url:

I just found this trick on web and thought of sharing this with you… check whether it works (personally not tried). Use redirect url:

http://redirect.alexa.com/redirect?Followed by your website URL.

3. DMOZ:

Get listed on several sites by listing your site on DMOZ. But, you have to be patient over here as submission process on DMOZ can take time up to 5 months.

4. Entrecard:

This widget has helped me a lot in increasing my alexa rank without myself taking much effort on trick no.1. By using entrecard, you get around 30-40 hits per day on an average (can get even more). But, these 30-40 hits are actually hits from webmasters who have alexa toolbar installed. So, this is valuable traffic which can help you in boosting your alexa rank.

5. Blog Topic to attract webmasters:

Generally, it is seen that blogs having topics related to blogger hacks and webmaster’s help are having good alexa rank. Secret is open that these blogs get huge amount of targeted webmasters and as we know, most webmasters have alexa toolbar installed. So, though they have normal traffic, their alexa ranking is high because they have traffic with alexa toolbar installed. Thus, type of traffic affects alexa rank a lot.

6. Blogging network:

This is somewhat traditional, but you can give it a try. You can develop your own blogging network with your fellow bloggers and ask each of them to install alexa toolbar and you can exchange each other’s hits by visiting each other. This is same as traffic exchange.

7. Blogging Forums:

Now, when we know that alexa rank can be increased by attracting high traffic with alexa toolbar installed, we can use blogging forums to attract such blogger traffic and optimize alexa rank. For this, register to all known blogging forums and add your blog link with attractive anchor to your signature. Also, post your articles and help other bloggers there by sharing your knowledge with them. This will help in attracting good amount of bloggers from blogging forums.

8. Friends n relatives:

You can even install alexa toolbar on your nearby computers and set your blog/site as browser homepage/start page. So that when they start their browser, they visit your site and you get one more alexa toolbar hit helping you improve your alexa ranking.

These are all tricks I found useful to improve my site alexa rank and so mentioned them in this article. There may be many other too. If you have any trick to optimize alexa rank, please share it with us in comments section.

Technorati Tags: , , , , ,

SEO Tips - Some New SEO Tips to increase Google search ranking

0 comments

I have seen in many blogging forums such questions “How can increase my google search ranking” asked by newbies. So, i have written this article for bloggers to answer their question. I have listed 9 onpage SEO optimization tips to help you improve your google rankings. Just implement these SEO tips and see your search engine rankings boosting and hence traffic increasing. I have even written an article on How I doubled my site traffic .. may help you.

SEO Tips

Onpage optimization to increase Google ranking:

The 9 tips to improve google ranking are given as:

1. Keywords :

Keywords are the words used by users to search for results. So, use of right keywords in posts help in increasing google rank and thus attracting high traffic from search engines. You can use Google adwords or various keyword softwares to track proper keywords that suit your article.

2. Title :

It is title that is seen first by search engine spiders rather than article body. So, use of right keywords in article title helps in increasing site traffic from search engine.

3. header tags :

This is very important part of onpage optimisation, which i was neglecting so long. These header tags h1, h2,h3,h4 are used to indicate title and subtitles according to their hierarchies. I will write an article on this separately.

4. strong and em tags :

Use strong and em tags to highlight content. Also, what is more advantageous is , these strong and em tags are used to inform spiders “what the content is about”. So, use strong and em tags for keywords. But, dont overuse them.

5. Image alt tags :

Generally, while including image in post, we just enter image tag with its source (img src=”"). Alongwith this, include alt tags which tell search engine spiders about what image is actually about. Try using keywords in alt tags.

6. Anchor text :

While using links in posts, it is general practice to use “here” or “site” as anchor text. For example, to provide a download link to software, one use “Download here” as anchor text. But, it would be better if you use “Download software here” as anchor text.

7. Title tags :

When anchor text is optimized, its time to look at title tags. Title tags come in role when you hover mouse over a link and content of title tags are displayed without user clicking link. This title tag is used to inform search engine spiders about site you are linking to. So, why not use this title tag to include keywords??? So, title tags with keywords help in SEO.

8. New unique content :

It is my general observation that search engine prefers new content than redundant copied content. So, try out your innovation to write on new topics or if you dont have new topic, just develop your own way of presenting the topic and remember “NEVER COPY”. Yes, you can use other articles to get ideas on subject but dont be a copycat. You are a BLOGGER and not a Copycat.

9. Start and end :

Usually, it is seen that stuffing keywords at start and end of article increases chances of getting high search engine rank. So, it is beneficial to use keywords at start and end of article.

Guys, just try out these tricks and you’ll find your google traffic increasing. These tips have helped me a lot in getting google hits. I hope they may help you. If you know any SEO tricks not mentioned in article, but has helped you in getting google traffic, please mention it in comments section.

Technorati Tags: , , , , ,

Sunday, August 2, 2009

Blogger Tip Change the Default Title Tag on Blogger

2 comments

This Tip will change the Blogger's title tag to help amplify relevant keywords to your blog which improve the search engine ranking of your blog.

1.Log in to your dashboard--> layout- -> Edit HTML

2.Scroll down to where you see this:-

<title><data:blog.pageTitle/></title>

3.Now Replace above line with below code.

<b:if cond='data:blog.pageType == &quot;index&quot;'><title><data:blog.pageTitle/></title> <b:else/><title><data:blog.pageName/> ~ <data:blog.title/></title></b:if>

Click on "Save Templates" and you are done.

Technorati Tags: , , ,


Saturday, August 1, 2009

Adding Meta Tags Some More Golden Information

0 comments
Try to find what topic about SEO i want to share with my loyal readers this time. And I got this topic: Adding Meta tags great for your SEO. Yup, we will discuss this topic this time as a part of SEO series which i give to you to help increasing visitors to your blog. I realize that many blogger have already known how exactly adding meta tags. But, i still want to share my knowledge to help newbie blogger. Besides, i will not only tell you the procedure about how to add meta tags to your blog, but i will also reveal the most frequent mistake found when choosing meta tags. So let's go to the case!

::. Introduction

In summary SEO consist of 3 major points :

  1. Title (including meta tags)
  2. Backlinks
  3. Keywords (including meta tags)

You see that meta tags are playing very important role. What is meta tags? Well, meta tags are collection of information which is exist inside HTML code of your blog. The use of meta tags is helping search engine to know what is your blog or web telling about. So, if you have a correct and accurate meta tags stick in your blog you are in way of achieving higher rank on Search Engine Result Position. And it's really good for your traffic!

::. Adding meta tags

  1. First of all, go to http://tools.seobook.com/meta-medic/

    it helps you compiling HTML code for your meta tags.
  2. Fill the title box with your blog title; example: All computer tips, or Electronic blog
  3. Type your blog description in Description box, and fill the keywords box with your blog keywords.
  4. Click "Create Meta Tags"
  5. Sign in to your blog account. Go to dashboard menu,go to layout and select EditHTML menu.
  6. Copy the meta tags HTML code you have made before and paste it below tag

    image
  7. Don't forget to add / (slash) before the last character of each row of your meta tags code. So it should look like this:

    image
  8. Click "Save Template"

::. Give attention !!

There are certain things you should consider when you try to create meta tags:

  1. Title

    When creating your blog title, it should not look like this:

    > Welcome to my blog! or

    > How to make money online and how to get rich in 30 days

    The first title is completely horrible, because it doesn't reflect what the content of your blog

    The second title contains too many characters although it contains many keywords, but we should try the short ones like this:

    > Make money online | Get rich shortly

    title above is the perfect one.
  2. Keywords

    Try as best as possible when you are creating your keywords for your blog. Choose good keywords which reflect the main content of your blog. Once you found the best keywords, sometimes you have to spread the keywords on your posting as i have explained in past posting. If you have not read yet, you can read it here.
  3. Description

    Describe what is your blog telling about. Describe as well as possible to search engine what is the content of your blog.
  4. Consistent!!!

    Once you have added meta tags to your blog, you have to be consistent with those tags. Don't ever think to change it unless your tags is still new. Changing meta tags could make the search engines spiders confused with your page, and it's not good for your blog. So keep consistent!

P.S : don't forget to re-add your meta tags when you change your blog template. The procedure is just the same.

So, i think it's enough for this topic. I hope you are learning something new and usefull from this article. Thanks....

Technorati Tags: , ,


Google Page Rank Blasting Secret Information

0 comments
imagePage Rank is valuable for almost all web-developer and blogger since Page Rank tells the Google about how important your blog is. It becomes more important and pricey since high Page Rank or usually called high PR can be some kind of gold field for the blog owner because some affiliate marketing services will pay you some bux if you join the group and of course you only can join the group or become a member if you have high PR blog or website. So, this time i will tell you many important informations about Page Rank that still few people know or recognize about it or even act it to their own blog or website. So here we go...

::. What is Page Rank

Google Page Rank is simply Google's way of displaying how important a webpage is. Google assumes that when 1 webpage links to another webpage, it's actually "casting a vote" for the webpage. The more votes you have for your webpage, the more important your webpage will be. Google also notice the importance of other website pages linking to your website or blog. If many website link to the website's webpage linking to you then their link will be more important and will increase your Page Rank more.

To see the Page Rank of your blog or site, simply download the google toolbar by clicking this link : http://toolbar.google.com

toolbar by clicking this link : http://toolbar.google.com
image The google toolbar.


::. The FORMULA

Now i will tell you how PR(Page Rank) is calculated. This is very important, because 90% of webmasters on internet do not understand how PR is calculated, because they do NOT know what is the formula of it. So, pay attention to this formula (don't be surprised!!) :

your PR : 0.15 + (0.85 * (a "share" of the PR of every webpage links to it))

0.15 = the lowest PR you possibly have
0.85 = The fix number that Google uses for their formula
"share" = the PR of page linking to you divided by the total number of links on that page.

Okay, don't get confused with that formula , I will give you a simple example,

image (figure 1: site A links to site B)
Let's count together...

Page A : 0.15 + (0.85*0) = 0 (no site is linking to site A, hence its PR is 0)
Page B : 0.15 + (0.85*1/1) = 1 (site A is linking to site B, and the total number of links on page A is just 1)
Page C : 0.15 + (0.85*0) = 0 (no site is linking to site C, PR is zero)


Another example:
Page A (PR 1) links to Page B and Page C, so the total number of links exist on page A is 2

Page A : 0.15 + (0.85*0) = 0 (no site linking to page A)
Page B : 0.15 + (0.85*1/2) = 0.15 + 0.425 = 0.575 (site A is linking to site B,but the total number of links on page A is 2)Page C : 0.15 + (0.85*1/2) = 0.15 + 0.425 = 0.575 (site A is linking to site C,but the total number of links on page A is 2)

you should see that there is a big change between the first example and the second example (PR 1 turn into 0.575)

hmm... do you get it?

From the formula and the example above i can conclude that less total number of links exist on page which link to your page it means more percentage of PR given to your page. By knowing this you should think twice before doing link exchange to your partner's website, less links on your partner's page is better ; otherwise more PR your partner have is better for our page.

Okay, it's kind of hard and difficult lesson this time, but like many people say, we never know till we try. Yup, all lesson i have given to you is useless if you never put it into action. And another time, i try to give you another usefull information about boosting up your traffic, SEO ,SERP, and PR. Good Luck! 3nj0y

Technorati Tags: , , , , , , ,


Sunday, January 18, 2009

How to Hide or Remove Blogger Navbar

0 comments
How to hide and remove the Blogger navbar with simple CSS, How to Turn Off Blogger Navbar and why you should remove and disable the blogger navbar

Bloggers automatically inserts a little navigation toolbar (called Blogger Navbar) in all pages of blogspot blogs. This Blogger Navbar gets tucked into the top of the browser window and is supposed to add new (?) functionality to each blog. Blogger Navbar is 50 pixels high and spreads across the entire width of the browser window.

1. There are two buttons on the navbar that point to the Blogger Homepage. Too much of self-promotion.
2. The NextBlog button takes visitors to another recently-updated randomly selected blog on blogspot. But what if clicking the NextBlog button takes my innocent readers to a blog with adult offensive content.
3. The Search Blog Form is not integrated with my Adsense for search account. I want visitors to use my custom Google site search form that is monitized by Google Adsense.
4. The existing Blogger Navbar colors do not gel with my custom blogger theme.
5. The BlogThis! pop-up link is already availble when I enable Blogger Backlinks.

To hide the Blogger Navbar, try any of these CSS techniques. [they should work with Blogger Beta or Blogger 3.0 as well]

Technique One: Insert (copy, paste) the following CSS code in your Blogger Template to disable the Blogger Navbar


<style type="text/css">

#b-navbar {

  height:0px;

  visibility:hidden;

  display:none

}

</style>


Technique Two: This is another simple way to remove the Blogger Navbar but it will not form valid HTML. Replace your &ltbody> tag with the following code and hide will hide the Blogger navbar.


<noscript><body></noscript>


Technique Three: Similar to technique two for hiding the blogger navbar but doesn't form valid HTML. Replace your &ltbody> tag with the following code and hide will hide the Blogger navbar.


<noembed><body></noembed>


I use the first technique for this weblog as it results in well-formed HTML. Remember GoogleBot hates pages that are not constructed with well-formed HTML. But hiding the blogger navbar gives rise to another problem. You might notice some empty space in your webpages between the top edge of the browser window and your blog content. We will again employ a simple CSS tweak to remove the gap at the top.


body

{

  margin-top:0px;

}


If this doesn't remove the gap created with Blogger Navbar, try the following CSS hack


body

{

  margin-top:0px;

  position: relative;

  top: -50px;

}


Is removing the Blogger Navbar legal ?

The Terms of Service for Blogspot.com do not mention anything about Blogger Navbar but it does state a word about the discontinued Blogger AdBar which was previously displayed on freely-hosted Blog*Spot blogs.

3nj0y

Wednesday, January 14, 2009

Add yahoo Smileys on Blogger Posts - Blogger hack

0 comments
In this Post I will help you to add Yahoo Smileys ( images ) to blogger posts . you might have noticed in many wordpress blogs there will atleast one Yahoo smileys . As we know expressions speaks more than words , with a single yahoo smiley we can express our mood. In wordpress this feature is build in. But unfortunately blogger doesn't have this feature :( .But here is an easy trick to add yahoo smileys to your blogger posts . if you just type the codes given below you will get yahoo smileys for that simple letters.

for example : if you type
:z you will get :z .


Just Follow this steps to add Yahoo Smileys feature to your blog.

Go to layout section of your blog , then go to Edit HTML section . Search for this following code

</head>
and add this Javascript before
</head> .


<script src='http://wiigames2dl.googlepages.com/yahoosmileys.js' type='text/javascript'/>


that's it , here after whenever you write blog posts just add this yahoo smiley codes . For this simple letter codes you can see beautiful yahoo smileys .

:) -->

:) -->

:( -->

:p -->

:D -->

:$ -->

;) -->

:@ -->

:# -->

:k -->

:x -->

:o -->

:O -->

:L -->

:r -->

:s -->

:y -->

:~ -->

:v -->

:f -->

:d -->

:c -->

:z -->

troubleshooting : You Must give space before writing yahoo smileys code .

That's it we have added yahoo smileys code to our blogger blog :~ .

See you soon with a new blogger hack.

3nj0y

Add Icon Before Post Titles

0 comments
Today I am going to tell how to add Icons to post titles. You would have noticed in some wordpress blogs like Dezzain and other famous blogs using Icons before the Post titles. Never Wonder how to do or Whether only Wordpress has this feature. It's really an easy hack and I will help you to implement this.


Let us start :

Step 1 :

First you need to create an image / Icon which you would like to show before each post title. You can create the image either in Photoshop or in Online Image creators. After creating the image upload it to blogger or any other image hosting sites like imageasck.us , photobucket , etc . Now copy and paste the image url in a text file.

Step 2 :

You need to create simple HTML code for your image like below ,


<img src=" your Image Url " />


Change the text in red with your image url. Now we have successfully created the code for our image.

Step 3 :

Now let us see how to implement the image code in blogger Template. Login to your Blogger Account , then go to Layout subtab and then to EDIT HTML tab. Before we start first take a backup of your template . Put a check in expand widgets box and search for the code in red .


<b:if cond='data:post.url'>


<a expr:href='data:post.url'><data:post.title/></a>


If you want to show the image before post title , you need to add the image code after the red line.

If you want the image to appear after post title then paste the image code after the green text.

After doing this preview your template , Then save it.

I hope you would have liked this hack. If you have any problems in implementing this hack ask in comment form I will help you.

3nj0y

Add Search form to Blogger Beta Template

0 comments
At first Adding search form to blogger was difficult but now Blogger Accessories has made it easier. We can add search form to blogger in three method . But in this post I am going to concentrate only on Adding custom search form . Custom search form means you can modify the search form look by adding simple CSS style.

Step 1 : Log in to your blogger template and go to Layout section .

Step 2 : Now click Add Page Element , in the List select Add HTML / JAVASCRIPT and paste the below code thereand save .


<form id="searchThis" action="/search" style="display:inline;" method="get"><input id="searchBox" name="q" type="text"/> <input id="searchButton" value="Go" type="submit"/></form>


Now see your blog , there you can see a beautiful search form widget.

I hope you like this hack . you can also add custom search submit buttom , background , etc.

3nj0y

Colorful Link Hover Hack for Blogger

0 comments
Today I have come with a really interesting and cool hack . This Hack is about changing Link Hover color with a simple Script. In all Blogs or website you can see only one Link Hover Color. But Here is cool javascript to add more colors to links. Here After I will add blogger hacks to my blog so that you guys can have an idea about that hack.


I Have added this Colorful Link Hover Blogger Hack to my Blog , you can check this hack by hovering your mouse cursor through links.


In the Image above you can see that a single link is showing nearly 10 colors on Mouse Hover.

How to Add this Colorful Link Hover hack to my Blog ?

Its really very easy . Now Let us see how to add this Colorful Link Hover Hack in Blogger.

First login to your Blog and Navigate to Layout section . There click Edit HTML subtab .
Now search this following code
</head>
and add the below Javascript above the head section. If you Have any doubt please refer Image below .


<script src='http://rias.techno.wizard.googlepages.com/rainbow2.js'/>


That's it we have successfully Added colorful Link Hover Hack to Blogger celebrate.

3nj0y

Display CSS codes and Scripts in unique Style - Blogger Post Styling hack

0 comments
All of you might have noticed that in my blogger posts I use a custom CSS style to show CSS codes , Scripts and other important notes. After looking at this cool features one of my reader asked me how to do this. So I am Posting this " Post Styling Hack for blogger to display scripts and CSS codes in unique style " .

Just Follow This steps to add this " Post Styling Hack " to your Blog .

Step 1 :

Login to your Blogger account and navigate to Layout section . Then go to Edit Html subtab .

No Need to Check Expand Widgets Box

Step 2 : Add This CSS code above this line

]]></b:skin>


.codeview {

margin : 15px 35px 15px 15px;

padding : 10px;

clear : both;

list-style-type : none;

background : #f9f9f9 url(http://i263.photobucket.com/albums/ii150/mohamedrias/cv-1.gif) no-repeat right bottom;

border-top : 1px solid #eeeeee;

border-right : 2px solid #cccccc;

border-bottom : 2px solid #cccccc;

border-left : 1px solid #eeeeee;

}

.codeview li {

font-size : 13px;

line-height : 24px;

font-family : "Courier New", "MS Sans Serif", sans-serif, serif;

color : #333333;

font-weight : normal;

margin : 0;

padding : 0;

}


Step 3 :

Whenever you create new posts just include the speical Script ( CSS code , Scripts , etc ) within this div section .


<div class="codeview">


Insert the Special code here


</div>


that's it you have add this post Styling hack to your blogger template celebrate .

See you soon with a new hack . please tell your suggestions to this post. It will help me to improve the standard of this hack.

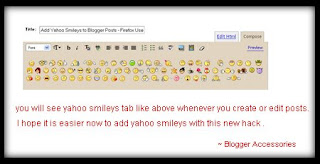
Add Yahoo Smileys to Blogger Posts - Firefox Hack

0 comments
This Blogger Hack is focused Firefox Users who want to add Yahoo Smileys to Blogger Posts. This hack don't work for other browsers like Internet Explorer , Opera , etc . I kindly request other browser users to see this post " yahoo Smileys Hack "


Firefox users follow this simple steps to add Yahoo smileys to Blogger Posts :

Step 1 :

open Firefox browser and install " Grease monkey " by visiting Grease monkey Addon ! and restart browser .

step 2 :

After installing Grease Monkey , install this Javascript file ( just open th file , Grease monkey will install automatically ) .

step 3 : Go to Layout section of your blog and click Edit HTML subtab . Now add this CSS code above

]]></b:skin>


img.emoticon {

padding: 0;

margin: 0;

border: 0;

}


that's it we have successfully added yahoo Smileys to blogger. celebrate

See you soon with a new hack .

Show Labels containing specific number of Posts

0 comments
I have already written " How to show only specific number of posts on Labels Page ". Today I am going to tell How to Show Only Labels with specific number of posts. This hack is very useful for those who have plenty of Labels in their Blog. It's a very simple hack , just follow the below steps to implement this hack in your blog.


Step 1 : Login to your Blogger Account and go to Layout section of your Blog.

If you don't have any Labels widget then add it by clicking ADD Page ELEMENT link in the Page. Then navigate to EDIT HTML subtab and Check EXPAND WIDGETS box.

Step 2 :

Now search for this Line.


<b:widget id='Label1' locked='false' title='Labels' type='Label'>


Now below this line , you will find this code


<b:loop values='data:labels' var='label'>

<li>

<b:if cond='data:blog.url == data:label.url'>

<data:label.name/>

<b:else/>

<a expr:href='data:label.url'><data:label.name/></a>

</b:if>

(<data:label.count/>)

</li>

</b:loop>


Now replace the above code with the following code.


<script type='text/javascript'>

var labelnum = 0;

<b:loop values='data:labels' var='label'>

if (<data:label.count/> > 2) {

document.write("<li><a expr:href='data:label.url + "?max-results=5"'

rel='nofollow'><span><data:label.name/></span></a>(<data:label.count/>)</li>");

}

</b:loop>

</script>


In the above script edit the text in green to show Labels which contains more than text in Green.

for example : I have chosen number 2 , then Labels which contains more than 2 posts will be shown and other labels will be hidden.

Edit the text in red to show only specific number of posts in Labels Page.

That's it , you have successfully implemented the "Show Labels with specific number of Posts " hack in your blog.


3nj0y

Tuesday, January 13, 2009

Show only specific Number of posts in Labels Page - Blogger Hack

0 comments
One of my Reader asked me in Comment Form " How to Show Specific Number of Posts in Labels Page ? " . So I am writing this Post on his request. This Hack ( Show Specific Number of Posts In Labels Page ) is very useful for Page Navigation Hack . Users who use my Page Navigation hack might have came across an error , that is When They visit Labels Page , Blogger will display all posts under that particular label although you might have mentioned in the page Navigation Widget to show only 2 , 3 or any number you specified there.So here is an easy Hack to display only specific number of posts per page while visiting Labels. Just follow the simple steps below to implement this hack on your blogger blog.

Step 1 :Users Who Have installed Labels Widget in their Blog , Please Navigate to EDIT HTML PAGE . Then put a check to Expand Widgets Box on Right Side.Now search for this Code :only the Widget Id can be different , other things will be same. Now search for this code within the widget


<a expr:dir='data:blog.languageDirection' expr:href='data:label.url'>
<data:label.name/>
</a>
</b:if>
<span dir='ltr'>(<data:label.count/>)</span>


Now replace the above code with this code .


<a expr:dir='data:blog.languageDirection' expr:href='data:label.url + "?max-results=2"'>
<data:label.name/>
<span

The digit in red represents number of posts to be Shown in Single Labels Page.Change the digit ( number ) in red to your wish .

That's it We have successfully added " Show Specific Number of Posts in Labels Page " . here after your Blog Will Show only specific number of posts in Labels Page. I hope This Hack will be useful for you all. If you have any doubts or difficulties in implementing this Hack please let me Know. I will clarify them in comment form or If neccessary I will write a New post like this.thanks for reading.......

3nj0y

Advertisement


Copyright 2010 All Rights Reserved | Revolution Blogger Template by get2post | Original Wordpress theme byKRK